Slightly Warped

One of my favorite subjects, especially in the fall, is the reflection of trees in a calm lake. But unless you’re directly across from the trees (or other subject) you want to capture, your perspective may be slightly skewed – so that the resulting picture makes it look as if the water is going up or down – in other words, it looks like the lake isn’t level.

I had the opportunity yesterday to capture some lake reflections in the Adirondacks. Here’s the original picture, in which the trees were slightly lower on the right hand side:


Version 1
See how the lake seems to dip down on the right hand side?

I asked Carl about this during last week’s workshop. He suggested that I take a look at Perspective Warp in Photoshop. Most of the videos I found online about Perspective Warp had to do with fixing buildings; however, I think I’ve made it work for this problem, like so:

  1. Open the photo in Photoshop. Create a new layer from the background.
  2. Select Edit > Perspective Warp.
  3. With Layer selected in the top left, draw a box around the entire photo.

    Screen Shot 2015-10-04 at 10.03.36 AM 

  4. Select Warp in the top left. Drag the top-right-corner handle up to level out the landscape.

    Screen Shot 2015-10-04 at 10.04.51 AM

… and voila, the final version!


Autumn Reflections


Now I feel compelled to fix all of those other reflection photos I’ve posted.

Adirondack Workshopping

Yesterday I spent the day in a workshop led by Carl Heiman, who specializes in landscape photography in the Adirondacks. We (hubby and I) hopped in the car around 9 and were in Old Forge by noon.
On the Moose River I
It was a beautiful day, sunny with wispy clouds and temperatures in the 60’s.  Normally, the fall colors peak right around this time each year – but this year they were “brown and down”. There was still plenty of beautiful scenery.
On the Moose River III

Carl was terrific – very knowledgeable, very friendly, very approachable. I had the opportunity to ask a question that has bugged me from time to time. It has to do with shooting across a body of water, when you’re not pointed directly across but maybe to the right or left around 10 degrees. The perspective is skewed a bit, enough to make it look like the horizon isn’t level. The answer? Use either Warp or Perspective Warp in Photoshop.

The rocks in the back of this shot were a bit of a problem in this regard, so I used Perspective Warp on them. I was happy with the result.
Rock Formations


We shot until after dark and made it home before midnight. A fun day out!
Adirondack Reflection


In the course of a year (part 2)

In my last post, I started listing some things that I’ve learned about photography in the last year. Occasionally I feel stuck in a rut, possibly because I’m not learning as much (and as quickly) as when I was a beginner. Being able to reflect on a year’s photography helps remind me why I keep trying.

Item Learned #5: Enjoy June, it goes far too quickly.

In June, it feels like summer will last forever. On the weekends I get up early to visit the garden; the sun is bright, there’s dew on the grass, and the bees are everywhere. If I don’t get any pictures I love, I always think: that’s OK, there’s always next weekend. But no. I need to remind that June will pass in a heartbeat.


dewdrop


Item Learned #6: Just be patient

Sometimes I’m convinced that all of the ruby-throated hummingbirds of the world keep track of my whereabouts so that they can tease me. For 3 weekends in a row this summer, I spent hours in the gardens. I’d spot a hummingbird and it would fly off; so I’d stay in the general vicinity, waiting for its return. Of course it would never come back. I was finally rewarded a few weeks ago – not the showy male hummingbird, but a pretty female. I’ve been told that the great wildlife photographers spend days in a blind waiting for their subjects. They’re far more patient than I am.


Anticipation


Item Learned #7: Your results may vary

Twice a year I have the opportunity to photograph fireworks – July 4th at the lake, and Labor Day out in the country. I usually come away with a few shots that I like, but I’ve always had problems with the grand finale being overexposed. I finally got it right this fall by changing settings just before the big moment. (ISO 200, f/14.0, 5s).


Grand Finale


The things I’m learning aren’t always technical. These days, they’re much simpler, but more profound: be patient. Be willing to adjust. Be willing to be uncomfortable. And most important: enjoy every minute.

In the course of a year (part 1)

A comment from Derien on last November’s post made me start to think about what I’ve learned about photography in this past year. At first I thought – wow, I just didn’t really spend as much time thinking about photography as I had in the previous few years… but then I decided that I learned lots of little things, some more technical than others. Here’s a quick rundown, which I’ll split into two posts.

Item Learned #1: Don’t let weather (and the calendar) get in your way.

Thanksgiving morning, early: fresh snow, still falling. I drove up to Sapsucker Woods; the parking lot was empty, everyone was home sleeping in (or enjoying the holiday). I started off down the trail around the pond, but didn’t have to walk very far before I found these deer. I could have just stayed home and enjoyed some nice warm tea, but going out in the wintry cold paid off.

Winter Morning

Item Learned #2: Patience is a virtue.

I bought a used Canon MP-E 65mm specialty macro lens last year, with the primary purpose of capturing snowflakes. I needed to wait for just the right kind of snow – where the flakes were dry enough to keep their definition, and where they weren’t falling in 5+ snowflake clumps. When the snow was good, I’d hold black velveteen cloth out to catch some flakes, then bring it under cover to prevent catching more snow (but still in the cold so it wouldn’t melt). The lens, with its 1x-5x magnification and almost no depth of field, forced me to hunt around on the cloth for My Flake. Most of the flakes were semi-melted or broken by the time I located them. I also had lots of trouble keeping my fingers warm. The very few snowflakes that I managed to get were worth it, though!

  Snowflake

Item Learned #3: Get your feet wet!

My husband and I traveled to the Great Smoky Mountains in Tennessee for a workshop in April. Our guide, Joe Rossbach, LOVES waterfalls and precarious perches; and after being relegated to the rocks on the side of the creek for lack of proper clothing and footwear, I learned that you can get good photos from the side of the creek but you can get spectacular pictures from the middle. Still, I did OK, and I’ll know better for next time.

Spring Creek

Item Learned #4: Luminosity Masks

Another thing that I learned from Joe (besides the importance of being exposed to the elements at crazy hours of the day in very uncomfortable circumstances) was the more technical aspect of working with luminosity masks. Joe introduced me to Tony Kuyper’s TKActions panel, which allows you to (among other things) apply curves and levels to portions of a photo based on the amount of light – using masks based on groupings like “ultra darks” and “wide mid-tones”. I’ve used this on many pictures since, including this one taken at Dolly Sands in West Virginia on another of Joe’s workshops in May.  

Dolly Sods Sunrise

Stay tuned for part 2!

Time to Learn

On the Big Magnolia LeafLast week, someone left a comment on one of my posts, saying – don’t give up. You’ve got good stuff here. That was the second such comment I had heard in the week (the other one was from my very kind sister).

They were right, of course. The reason I even started this blog – they day I bought my first DSLR, almost 4 years ago – was to force myself to keep learning. The problem was, it’s relatively easy to learn lots of new things quickly when you’re a beginner; the more experience you get, though, the fewer the a-ha moments. And so I abandoned my blog. In retrospect, I pretty much stopped learning when I did that. Shame on me!

Not that all of this time has been wasted, though. I continue to take a picture a day, as I have for 1,357 days; all that practice serves as a placeholder… but it’s time to start learning again.

With that in mind, I chose this morning to spend some time learning how to use the $104 macro ring flash that I bought last month, based on some outstanding reviews on Amazon. The price was a steal – the Canon version of this flash costs $500. I had a cheapo ring flash that I bought a few years ago for about $35… it wasn’t even worth that.

So, I spent some time reading up on using a ring flash online, and watching this Bryan Peterson (PPSOP) video: http://youtu.be/7Qko6TQR8IA . This was the first time I had ever heard someone say – go ahead, use a flash even if there’s natural light! That was soooo liberating! What it meant to me was — I didn’t have to try to use a tripod in awkward positions or give up my morning caffeine in order to hold the camera stock-still.

First I tried it out on some leaves that I had picked up the other morning and brought inside:
Autumn Colors
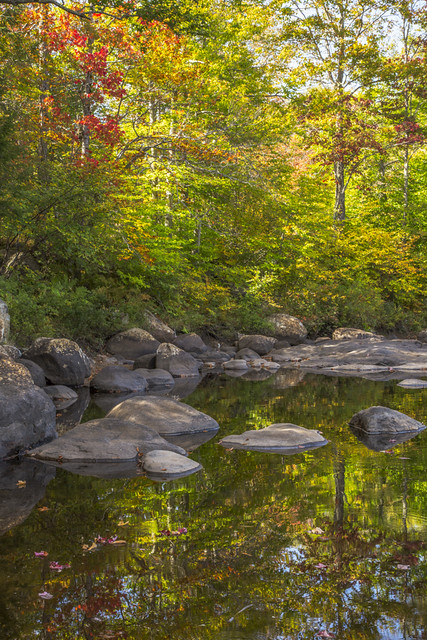
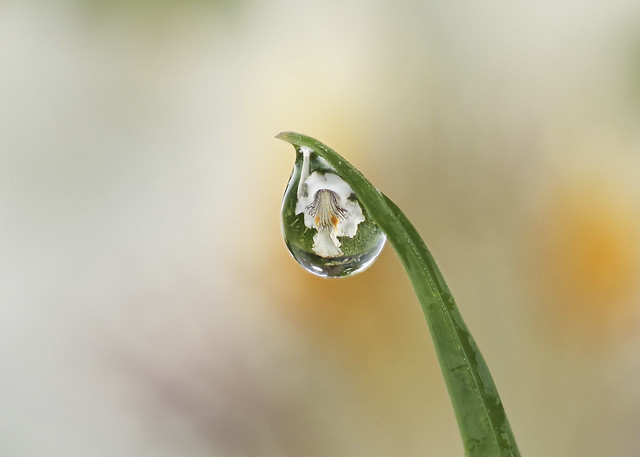
Then I went for a walk to see what I could find outdoors. I wasn’t disappointed! My take included the water drops on the leaf (from a Big-Leaf Magnolia tree) at the top of this post, and this “changing seasons” shot:

Changing Seasons

From autumn to winter.


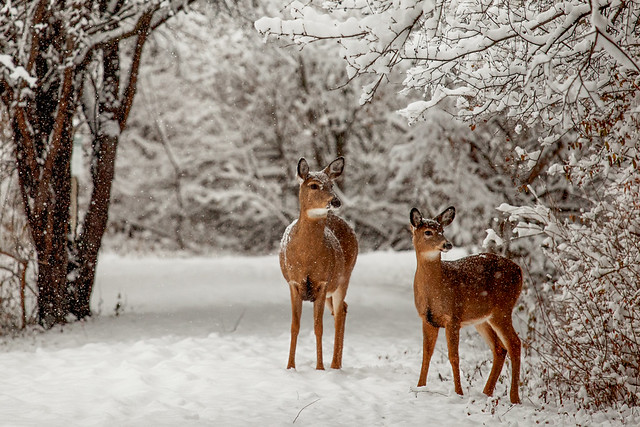
One thing to note, which is pointed out in the video, is that using the macro ring flash will make the background really dark, like so:

A rose, after the first snow

A rose, after the first snow

This will all be good to know as we march into winter. There should be plenty of miniature things to photograph inside, and when the weather is right, I hope that this lighting will make snowflake photography easier. Fingers cross!

(Technical note: I used the Canon MP-E 65mm lens, which has almost no depth of field, so it was necessary to use very small apertures (e.g. f/16). The mantra on the video is: 1/250, f/22 – but that was for his lens, not mine!)


Catching some rays

Now that summer is finally here, we’re seeing some sun and lots of color! I’ve decided to embrace the sun rays and make them part of my pictures while I can. (Here in upstate New York, winter will be here before we know it.)

I took this picture yesterday morning and posted it on Facebook and Flickr:

Morning at the Plantations

Good morning, sunshine!

Several people have asked – how did I get the sunrays on the dew drop? Did I use a special lens or filter? Did I use any Photoshop trickery? Nope. It was just my Canon 100mm macro lens, with the camera in aperture priority mode, set at f/10.

The secret is: point the camera at your subject, towards the sun. The dew drop will contain whatever is behind and above the subject, and the sun rays will reflect off the edges. You can even see them in the viewfinder!

The second secret is: crop the heck out of the resulting photo.

Here’s another, taken this morning:

Morning Bluebells

Sparkly bluebell

Fun in the sun doesn’t mean just macro, though. I’ve had some fun with sun rays in some wide angle shots recently, too.

Sunshine on Tower Road

The world is aglow

For this type of shot, you should set your f stop as high as possible (i.e. use as small an aperture as possible). In this case, the settings were f/22 (that’s the highest f stop for this lens), ISO 250, shutter speed 1/30.  The key was to be careful to not overexpose the shot; when I got home, I loaded it into Lightroom, upped the shadows, and sharpened it a bit.

I hope this inspires you to catch some rays of your own!

Bouncy

I’m taking a class through PPSOP called “Photography Magic II”. This week’s lesson included instructions on making cinemagraphs. Here’s my first attempt:

Follow the bouncing ball

Follow the bouncing ball

It took me most of a day – partly because I was having problems with Photoshop crashing – but I learned a ton, especially about video capabilities in Photoshop (and in my camera – it was the first time I’ve taken video with it)!

The output is an animated gif, which won’t play in Flickr*, Facebook, or any of the other places I usually share my photos… so I’m not sure if I’ll spend a lot of time on these in the future. The cinemagraphs on this site are pretty inspiring, though… and if I ever want to do another, at least now I know how!

*they actually do display on Flickr if you click through and display them full size, but I don’t think a lot of people bother to do that.

—–

Update! Here is a more successful attempt at this technique. I still need to find out how to make it less jumpy from the end to the start:catForever

Photos Only

When I bought my first DSLR, in November 2010, I started this blog as a way to document the things that I was learning about photography. I’m still learning plenty, but there are photos that I’d like to share that don’t necessarily have any words of wisdom to go with them.

So, I’ve started another blog. You can find it at http://btfotos.com. My goal for the new blog is to just share pictures, and keep the words to a minimum.

I’ll still update this blog when I learn something and want to share it.

I hope you’ll visit the new site!


Life in 3D

I’ve been taking a MOOC (Massively Open Online Course) on Archaeology at coursera.org for the last month or so, and have really been enjoying it. Each week’s lesson includes a set of videos, readings, exercises, and a quiz. For this week’s topic, “What do you do with what you find?”, I chose an exercise that involved installing and using a (free!) 3D modeling program called 123D Catch.

The estimated time for the exercise was 2 hours, and I suppose I could have stopped after spending  just that. But of course I needed to create more than one model, and then I needed to tweak-tweak-tweak. I’m guessing I have about 14 hours into it by now.

The best of these models was of a sundial at the Cornell Plantations. Here’s a screen print of the output. The software provides an embed code to publish a navigable version on your web site, but the embed doesn’t work on wordpress.com… so here’s a link to the manipulable 3D:  http://www.123dapp.com/3dp-Catch/Sundial-3/1556978 or you can watch a video of it at http://youtu.be/YVYUbeKO1pQ.

Sundial 3d screenshot

Sundial Screenshot

To create the model, I took 64 shots from about 5 feet away from the sundial. The software has an option to show the camera angles:

Sundial screenshot with cameras

Sundial screenshot with cameras

There is also an option to manually stitch the photos, so if it’s missing something, you can let it know where to get the information. The automatically generated version of the sundial was pretty good, but the smaller items required a lot of manual stitching.

The end result was a little like a Quicktime VR with a lot more detail, and a little like a video game. Lots of fun, in a nerdy way.